A sound diffuser reduces echoes and reflections in a room by scattering the sound waves in many directions.
The downside to diffusers is that they can be expensive and it is sometimes hard to justify the cost.
Fortunately, you can build them yourself for just a fraction of the price.
This step by step guide will help you build your very own sound diffuser.

A DIY sound diffuser is effective, functional and looks great when wall-mounted or hung from the ceiling.
What is a Sound Diffuser?
A sound diffuser is used to disperse sound energy by altering echoes and reflections.
It does not absorb the sound, this helps to preserve the sound energy in the room and keep the liveliness of the sound.
It gives the room a sense of spaciousness without the distortion or echoes that come with it.
It is common for diffusers to be used alongside sound absorption panels as well as bass traps.
However, this is down to personal preference and the sound you are aiming to achieve within the room.
As you will soon see, a DIY diffuser is not only functional it is also fun to build and the end result is stylish.
Let’s get started.
1. Planning: Material & Placement
Before you start gathering material take some time to plan what material you want to use and where the diffuser needs to be located.
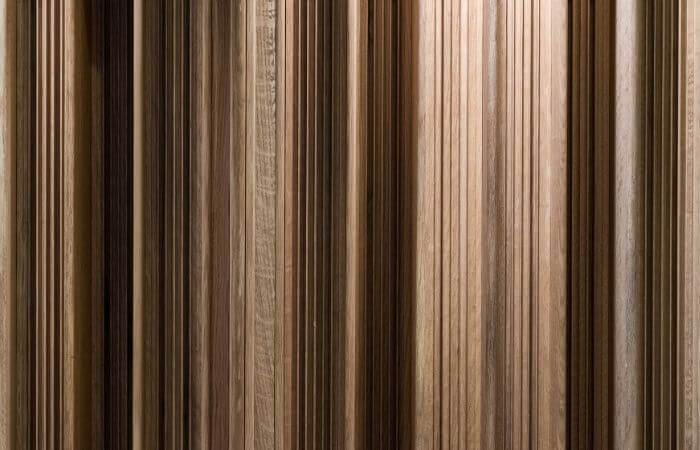
The preferred material for DIY sound diffusers is wood.
Wood is robust, easy to build with and offers great acoustic properties.
Any wood will work, it depends on the final look you want to achieve.
Popular options include plywood, pine, cherry or alder wood.
Once you’ve decided on the material, think about how big you would like the diffuser to be and where you are going to place it.
The placement will depend on the shape of the room and the location of the sound source.
Try to find where the reflection points are on your wall in relation to the speakers/ sound source.
This is where the diffuser(s) should go.
2. Choose a Diffuser Type
The other thing to think about is what type of diffuser you want to build.
There are a few types of diffusers to consider:
Quadratic-Residue Diffusers (QRD)
A QRD uses symmetrical positioning of the walls to scatter different sound frequencies.
You can make a QRD diffuser using columns or squares.
They are usually great for low-mid frequencies.
Making a DIY QRD is relatively simple and straightforward.
This type tends to be most effective when there is about 6 feet between you and the diffuser making it a great option for larger rooms.
Two-Dimensional Quadratic-Residue Diffusers (2D QRD)
A 2D QRD is slightly different from a QRD as you glue the towers directly to a side-less backboard.

If the diffuser is for a smaller space then a two-dimensional QRD is a suitable option.
Skyline Diffusers
This diffuser is technically a 2D QRD but is a popular type within its own right.
A skyline diffuser appears to be random and when complete it resembles a cityscape, hence the name.

The calculation required to make an effective skyline diffuser is more complicated than a QRD but putting it together is straightforward.
Once the calculations are complete a skyline diffuser is very easy to make.
3. Calculate the frequency range you want to diffuse
This is a critical step.
Once you know which type of diffuser you want to create, you can calculate the frequency range.
You can do this quickly and easily by using a frequency calculator computer program or app.
This will help you calculate the frequency range within the room.
You can then use the calculated figures to determine the shape and depth needed in your diffuser.
You can also use someone else’s measurements if they match the frequencies you are trying to diffuse.
As an example, here is a handy Skyline Diffusor calculator.
This calculator tells you the diffuser width, max column length and column width alongside a numbered grid for you to follow.
Make sure you copy/ save/ print out the grid or guideline generated by the app or software you use to get the diffuser calculations as these are important for the construction step.
4. Gather Supplies
Once you have the calculations for your environment and the frequencies you want to diffuse you can begin constructing your DIY sound diffuser.
The supplies needed depend on the type of diffuser you are making but the tools are the same for each.
Tools Needed:
- Tape measure/ ruler
- Pencil
- Sanding block
- Hand saw/ circular saw
- Wood glue
- Spray paint (purely for aesthetics – optional)
Material needed for a QRD:
- A wooden cabinet or frame with a backboard and four sides. This can also be a back-plate and separate sides that you glue together. This should look like an empty drawer and the boards should be around half an inch thick.
- Sectioning boards of about quarter of an inch thick.
- Square wooden poles that can fit between the vertical wells.
Material needed for a 2D QRD:
- A flat backboard without sides (½ – ¼” thick)
- Large square wooden poles (to be cut down to size)
Material needed for a Skyline Diffuser:
- A flat backboard without sides (½ – ¼” thick)
- Large square wooden poles (to be cut down to size). The width of the blocks will depend on the high cutoff frequency – as a rough guide 5cm x 5cm blocks will provide a cutoff around 3500Hz while 2cm x 2cm will provide a cutoff of around 8600Hz.
The measurements of the materials needed will vary depending on the size of the diffuser you are building and the frequencies you are diffusing.
The calculator should provide the relevant material measurements to make this easier.
4. Saw the wood down to size & sand
Cutting the wood to size is the most time-consuming part of this DIY process.
Your previous calculations should provide you with the height/ length required of each piece of wood.
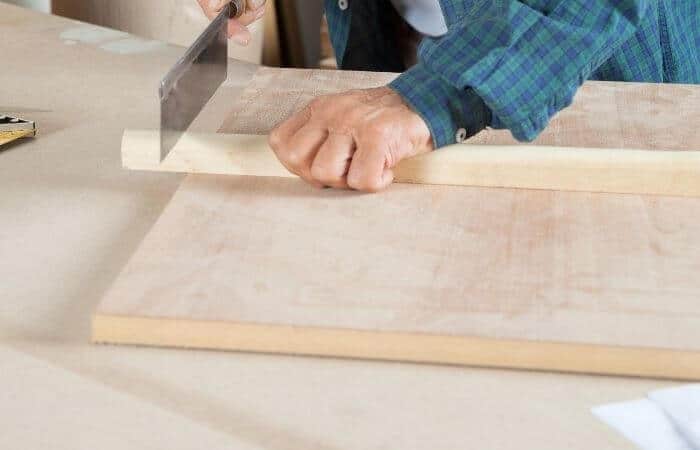
You want this to be precise so use the tape measure and pencil to mark out the length before cutting.
Once cut, make sure you label each pile of cut wood so you don’t get confused which is which length when you go on to construct the diffuser.
Depending on the size of the diffuser, you can end up with well over 100 separate pieces of wood (skyline or 2D QRD).
You should also sand the cut pieces so they are smooth and even.
5. Construct the sound diffuser
Once the wood is cut and has been sanded you can begin putting the diffuser together.
This is the easy part.
Constructing the sound diffuser is simply a case of stacking or layering the different wood pieces on top of the backboard in the calculated pattern.
Secure each of the pieces using wood glue as you go.
Make sure you use the template or guide created during the calculations.
This will help ensure the different height levels are placed in the right positions for the frequencies.
QRD Tips
When building a QRD you will need to insert the vertical dividers onto the back piece and secure them in place with glue.
Then you need to add the supporting blocks to the relevant positions (these blocks slot between the vertical dividers and will make sure the slats are at the right depths).
Finally, add in the slats between the vertical dividers.
Another method used to create a QRD is to layer strips of the same size on the backboard until the desired height is reached.
For this method, you don’t need the supporting blocks as you are simply using more slats to elevate the height rather than the blocks.
This method requires more material but looks good, is more solid and produces effective results.
Skyline Tips
When building a skyline diffuser, you will find it easiest to divide your backboard into a checkerboard pattern and mark each box so you know what length block it needs.
This is time-consuming but effective and the end result looks great.
You can also construct a skyline diffuser without a backplate by glueing the pieces to each other rather than to a backplate.
If you decide to do it without a backplate, you will simply need to sand the back of the diffuser with rough sandpaper so it is smooth and even.
www.instagram.com/p/BbtoWr-A9WB/?igshid=1x03kon5gq895
6. Leave the sound diffuser to dry
The wood glue can take a few hours to fully dry.
We recommend leaving your diffuser for at least 24 hours before attempting to move it.
Constructing the diffuser has taken a fair amount of time and effort so a bit of patience in these final steps can ensure you don’t need to repeat the process.
7. Paint it (optional)
This is an optional step.
If you want to alter the appearance of the diffuser you can paint it however you like.
Spray paint tends to be the quickest and easiest method.
You can have fun with this and create whatever aesthetic you feel suits your room.
8. Mount your sound diffuser
Now the sound diffuser is constructed and the glue has dried, it is ready to be mounted.
Where you hang the diffuser is completely up to you and should be based on the purpose of the room and the location of the audio source.
Try to hang the diffuser where the reflection points are within the room as this is where you will get the best results.
The mounting method you use will also depend on how heavy your unit is.
Z-clips or heavy-duty picture hangers will usually do the trick.
You may also want to hang it from the ceiling, in which case L-brackets are better suited.
DIY Sound Diffuser Summary
A DIY sound diffuser is a low-cost way of treating sound reflections and echoes within your home, office or studio.
The type of diffuser you create is up to you, each one mentioned above is fairly simple to make and produces great results.
As an Amazon Associate I may earn a small fee from qualifying purchases at no extra cost to you. This helps us run the site, so thanks for your support!
